Tuesday, 18 June 2013

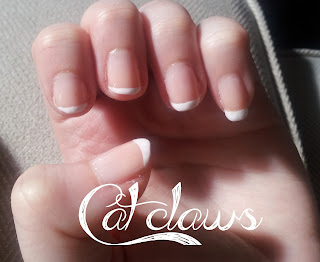
Simple French Manicure Tutorial

Nail art is fun and beautiful but it's not always practical if you're in a very professional atmosphere or have to wear a uniform in work. So here is an easy alternative: the classic French Manicure. 


People have been trying French manicure for years with not a lot of success. So many people I know can master one hand perfectly but once their less strong hand leads it gets very messy! With these quick tips you will be Parisian chic in no time.

Also, you can mix up the colours to have a crazy, bright French mani!

What you will need:

  • Base coat - I used Forever Strong Pro in 'French Manicure 76' by Maybelline
  • Tip colour - I used Nail Tip Whitener Lycra by Rimmel
  • Clear top coat - I used Dry Fast Top Coat by Seche Vite
  • French manicure nail tips OR file page sheet protectors!
    • I got mine from seller 'baby_dolphin_777' on eBay

Step 1: Apply your base coat and allow a long time to dry. It has to be completely dry to apply the tape or else it will come off and you'll have to start again. I recommend leaving at least an hour.
 Step 2: Once the base is well dried, put on your nail tip using your natural white nail as a guide


Step 3: fill in above the tip guide with your white polish. Make sure it's a thin layer otherwise there will be a step between them. Allow to dry well.

Step 4: apply clear top coat and clean up. Now you're done! 


Apologies for my irregular posts, I've been moving house so I'm living out of boxes but I will strive to make more regular and diverse updates.

Lots of love,

 xx


Tuesday, 21 May 2013

The Great Gatsby - Flapper Fever!

Apologies for the long time between posts, I have had exams to contend with. They are all over and now I am free to explore all the fashion and beauty trends for you!


The style shown in the new Gatsby adaptation are stunning and 1920s style is all over magazines and trends. The colours in the trailer are so beautiful that I was inspired to do Gatsby nails. The Art Deco theme around the logo just blew me away and that is what inspired the nails. 


The nails were really simple and I used Barry M Nail Art Pens in black, and Instant Nail Effects Foils in np320 (gold) for the base.


I can't wait to go and see the film and I'm sure it will inspire me to do some more looks from the beautiful era of Art Deco.

Love,
xx

Tuesday, 16 April 2013

Follow me on twitter!

Every time I make a new blog post I'll tweet with a picture and a link so if you want to be the first to know about everything new in the world of Cat Claws, follow me!

Click on the link or the picture to see my twitter profile. 

@catclawslondon


New polishes and Parisian nails

This Parisian nails have got a lot of attention from my friends and family! I was playing around with the new Barry M Nail Art Pens and their Textured Effect polish in Kingsland Road and ended up with this boutique-esque print and Eiffel Tower accent nail. The heart was in fact an accident as I forgot to leave space above the first platform so I used the pink hail art pen et voila - Parisian nails.

As for the Barry M Nail Art Pens, they are really easy to use because they aren't the traditional 'squeeze until polish comes out' pens. This means they are so easy to control that designs aren't shaky. They were a little strange to get used to at first hence the few mistakes in the nails but now I've got the hang of them I'm going to try really complicated designs I've been too scared to try before. I got them in Superdrug because there was a 3-for-2 but I've been reliably informed there is the same offer on in Boots but that they aren't in all Boots stores yet. 

The textured nail polish is great. I got this colour because I have less pinks than other shades and also Kingsland Road is my favourite place to go out in London so I had to have it. They go on easily (I did two coats) and are subtle but fun. They look like little bubbles on your nails! The nail art pens tend to fade on the top of this just because of the texture but you don't really need nail art on them because the texture is enough. I was just playing about and couldn't resist!


Keep an eye on the blog for much more fun with these nail art pens. If my nails weren't so pretty right now I'd be doing another design!


Love,


xx

P.S. Follow me on twitter! @catclawslondonhttps://twitter.com/catclawslondon

Friday, 12 April 2013

Butterfly wing nails - great for spring!


Spring is finally here (almost)! Is it just me, or has this been the longest winter of all time? I moved in to a flat in September and I remember thinking that the park out the front will be great to sit in on sunny days - I haven't even been able to do that! I mean, it's APRIL therefore spring should be here, but looking out my window is telling me a different story... 

So, help us all forget that it's grey outside I've painted a gorgeous butterfly inspired manicure to brighten up your talons and remind us that the sun is round the corner.


This is the type of butterfly I had in mind but you could do a blue, gold, coral or pastel palette of colours in the background to create whatever effect you desire. The only bit that will be the same is the black lines and white dots. 


What you need:
  • Base colour(s) - I used Barry M in NP301 Block Orange
  • Black nail art pen - I used WAH x Models Own
  • White nail art pen - I used WAH x Models Own
  • Clear top coat to seal, gloss and protect - I used Seche Vite


Base: 
  • Paint your nails in your selected base colour. 
  • It could be orange, like the ones I did, or you could use a sponge to create a shimmering ombre of colours for your base. There is a tutorial on ombre in my older posts!


 The three stages of painting the black lines:

  • One - paint a line along the top of the nail in black, thicker on one side than the other. Then paint a line 1/3 above the cuticle at the same angle, drooping down to one side.
  • Two - Fill in the space between the lines with three or four curved lines.
  • Three - Fill around these three lines to create a more natural and less angular look.


 Final stage:

  • Once the black has dried, use your white nail art pen to draw dots at the top of the nail to complete the look.
  • Leave to dry completely then add a top coat. (This may take a while!)


Thanks for taking the time to look at my blog. I'm always looking for more nailspiration so if you have any looks you'd like me to try just let me know!
Love,
xx

Wednesday, 3 April 2013

Quick, simple polka dot nails!


Polka dot nails are so simple yet are still impressive and cute. They can be done with any base colour, reds, blues and pastels look great. Then all you need is a white nail art pen or white nail polish and dotting tool. Let's get started!

Prep:

  • Apply a clear base coat to protect your nails, especially if you are using a navy colour which, although it looks great, it may also stain your nails.
  • Apply your base colour. Here, I have used Prickly Pear by Barry M (link to buy HERE). 


Organising your polka dots:


  • Create a row of white dots at the bottom. Try to keep them roughly the same size with similar distances between them. I tend to do only three or four so the nail isn't too crowded.
  • Above the first row, do a second row. The dots of the second row should be above the GAPS in the first row. This creates the even effect, rather than lines and lines of dots. 
  • If you have done three in your first row, do four in your second. For larger nails, do four in the first row and five in the second.
  • Your third row will go in the same pattern as the first, the fourth row in the same as the second and so on until the nail is completed.
  • Allow to dry completely and apply your top coat.
  • Don't forget to clean up any mess around the nail to make it look really professional.

Done!

Wasn't that simple? Keep an eye on the blog for more fashion, nail art and beauty tips from the one and only
xx

Monday, 1 April 2013

Leopard Print Nails


Leopard print never goes out of style. It can be garish (a la Kat from Eastenders), vintage (when worn in a Rockabilly way) and is very S/S 2013, as it's seen everywhere at the moment in pastel shades. You can use whatever pastel colours of nail polish you have lying around, just make sure you have a black nail art pen or a thick black polish and thin brush to do the outlines.

Prep:


  • Make sure to do a clear under coat. Try using a nail strengthening bottom coat, such as one by Sally Hansen, if your nails break easily and you want them to thicken up.
  • Apply your base colour. It could be the same on each nail, as shown above, or different, seen below.


The second print colour:
  • Make large dots on each nail and allow to dry. 
  • The dots must be of a different colour than the base coat. You can go for a consistent white or use the different pastel shades you have on each nail.
  • They don't have to be perfect circles and you can apply as many as you think looks good. I tend to go for four or five, depending on nail size.


The black detailing and finishing touches:
  • Begin to draw around your dots using a black nail art pen or thick black polish and paint brush. I used Models Own x WAH Nails nail pen in black because it's so easy to use and requires minimal clean up.
  • Try drawing around two sides of a blob (like in the second image), or make a boxy three sided shape. There is no wrong way to do this! Leopard print looks better the more randomly drawn it is.
  • Once you have drawn around all the blobs, make small shapes around them with the black, such as dots, little hearts or triangles to fill out the rest of the nail.
  • Allow this to dry and apply your top coat


Et voila! Easy leopard print nails that can be done in any combination of colours in order to fit any outfit or mood.


Thanks for reading this blog on leopard print nails. It's a really simple look that can be done while you're watching TV or reading a book as it doesn't require a whole lot of effort or accuracy. Keep an eye on my blog for upcoming posts on nail art such as butterfly wing nails, polka dot nails and flower nails.

Lots of love,
xx


Wednesday, 20 March 2013

VOGUE give their verdict on the best handbags of AW13/14

Click HERE for the link to the article.


Here are some of my personal favourites from the collection:

I absolutely adore these heart prints from Burberry. They have produced the print as all over patterns as well as accents and I just can't wait for this to catch on. Most heart prints come in the typical red, white and pink at the moment; it will be great to see them reproduced in more earthy tones, making them less preppy and more versatile.


This colourful doctor's bag from Mulberry:

I have a gorgeous vintage doctor's bag that I found in a vintage shop years ago in a lovely camel coloured leather. Its only problem is that it can feel a bit drab when teamed with muted colours. A bag like this would provide all the room but would be so much brighter.


The same goes for this cherry toned doctor's bag from Marc by Marc Jacobs. Perfect if you're bored of muted leather bags but too afraid/clumsy to have a bright green one like the ones above by Mulberry.

I can't wait for these looks to come about. Dare I say it? I think I'm getting bored of the satchel and these will be a welcome change without having to resort back to tiny clutches or oversized bags you could fit an Olsen twin in. 

Do you have any other favourites from the catwalks? I'd love to see what styles you like. Also, I'll be putting up another nail art tutorial in the next few days so keep an eye open for those. Don't forget to subscribe through e-mail updates or BlogLovin if you want to be told when my new posts are up!

Love,
xx

Monday, 11 March 2013

about me: who I am and why I'm blogging

Cat Claws mission statement:

This is a blog about fashion, nail art and beauty written by a total amateur but complete fanatic. I'm not involved in the beauty industry and I'm not remotely good at drawing or art, however I love to try out the looks I see on celebrities, catwalks and instagram. I like to think that this blog will provide someone just like me who has no experience in these fields with the inspiration they need to create something fashionable and beautiful. The longer this blog continues, the more I will expand it to include music, films and television that has inspired outfits or nails, for example. Last but definitely not least, suggestions are always more than welcome!


Here are a few key facts about me:

  • Name: Cat
  • Age: 22
  • Occupation: Student
  • Born in: Belfast
  • Living in: East London, although back in Belfast quite regularly and often for long periods of time

Here I am! This was taken by the amazing Big Bad Llama, a fantastic photographer and wonderful human being that I get to call one of my best friends. Check out his photographs and videos. He is a creative powerhouse.


 I am not a professional in the fashion industry, nor am I a beautician  I am a student, in fact I am a Law student. I am simply just extremely passionate about fashion and beauty. To me, they are a way of life. I am still young and am finding my feet in the world. I would love to get involved in these industries in the future, when I eventually get around to finding one of those 'real job' adults like to remind us young ones of so often. 

I really hope that I can bring the most of my talents to this blog through my writing, styling and nail artistry, allowing you to access trends you might be too afraid to try. Anyone can wear a fashion but it takes real personality to truly have style.

Love,


xx

Sunday, 10 March 2013

Follow my blog with Bloglovin


'Drip Drop': gunge nails how-to

I adore these dripping gunge nails. They're relatively simple to do and are really eye catching.

I got the inspiration for these nails from WAH Nails, who post them on their instagram all the time and have a great how-to in their book. (I've hyperlinked these myself, it isn't a bot! Click on them to look at their designs for inspiration or just to drool at their amazingness.) This is my take on the look as, since they published the book, I've noticed that WAH have added more detail to the gunge nails they post online, adding some shading and further drips.

A popular colour mix that WAH use is the red on black which looks really effective and gory. I like to mix up the colours so they don't look too Hallowe'en-esque, using candy colours as well as dark and gory types.

The colours I used were:


  • For the base: Barry M Gelly Hi-Shine in Watermelon (248), and Blueberry (243)
  • For the drip and effect: Models Own WAH Nails Nail Art Pen in Pink and White
  • For the top coat: Seche Vite Dry Fast Top Coat

Step 1: Paint your nails in the base colour. If you are using a dark base, it is best to put on a clear polish below in case your nail stains. Wait to dry.


Step 2: 
  • Once the base has dried, draw a line across the top of the nail with the colour you are going to do your drip effect in. 
  • Draw your first big drip by painting a circle and dragging the paint upwards towards the line at the top. Don't worry if it looks a little strange now, the more drips that are added, the better it begins to look.

Step 3:
  • Draw in a few more medium sized drips.
  • Begin to fill in the gaps between the drips. This is what makes them look more professional, giving a gloopier feel to them. Add in a few little drips as if they are just forming for a better effect.


Optional step 4:
  • If you are happy with your desired effect after Step 3, you can just wait for them to dry and add a top coat. 
  • You can also add more fallen drips towards the bottom of the nail, these look best below the little drips at the top, as if they have just broken off.
  • Wait for the drips to dry, and add in some shading with a white or black. Make sure to stick to one side, I think the bottom right looks best. Do a thin line or dot to make the drips look shinier.


Finally, wait to dry and add your top coat.

I hope you liked my take on the drip nails. I really like using these colours as they are a lot less gory meaning they aren't exclusively Hallowe'en nails. I'd love to see more colour combinations and effects, so post any that you do using these tips in the comments below!

Lots of love,
 xx


Tuesday, 5 March 2013

5 minute ombre nails: how-to

These nails are so simple to do and, with a quick drying top coat, you will be ready to go in 5 minutes! Each layer doesn't take very long to dry and I've managed to do these while waiting for a taxi to arrive.

Ombre is a trend that has been around East London for a few years now but it isn't going anywhere fast, it is instead migrating from hair to clothes and now nails!

I used these three peach to pink shades, but it can be done with two or three similar shades of any colour. Just use whatever you have in the house! Blue and grey shades are great too.

The colours I used in the picture: Barry M Peach Melba 318, Models Own Fuzzy Peach NP015, Models Own Raspberry Crush NP057

What you will need:

  • Two or three similar shades of nail polish to create an ombre hue effect
  • Make up sponges (can be bought in Primark or Poundland for a pound, or dollar stores and cheap drug stores in America)


Step 1: apply your base colour and wait to dry.
I used the lightest shade but it can also be done using the darkest shade as the base and getting lighter for a reverse effect.

Step 2: dab a little of your second colour on to a piece of paper, card or plastic (anything you can throw away.

Step 3: Dip a make-up sponge corner in the polish and begin to apply it to the nail.
Begin at the top of the nail and work your way down 2/3rds of the nail.
Only touch the top of the nail with the freshly dipped sponge to make sure the colour fades into the base colour seamlessly.
Allow to dry.

Step 4: Repeat step 3 but with the third colour, covering the top 1/3 or 1/2 depending on how seamless you want the ombre effect to be.
Allow to dry and apply top coat.

There you have it! Simple, quick nails that look impressive but require very little effort.

Lots of love,

Cat Claws.